Showing posts with label Gifts Kids Can Make. Show all posts

Monday, December 2, 2019

Cute Christmas Ornament for Preschoolers (Gifts Kids Can Make)


Every year at Christmastime I try to help my children look outside of themselves by encouraging them to make gifts that they can give to family and friends. (For more ideas be sure to check out my gift guide HERE.) While homeschooling my daughters co-op preschool last year we spent a month talking about serving and helping others. We talked about how when we serve our family it's like giving them a little gift. Giving a hug, helping mom or dad, or telling a story to a sibling are all little gifts we can give. When we do these things it's like we're a present! One week at preschool I wrapped each of the kids up in wrapping paper, put a big bow on their heads and took their picture. They though that was so much fun! This was in preparation to make a gift they could give their parents for Christmas and as a reminder that they can help and serve others.


The kids each got to paint a little frame for their picture to go in.


I printed off the pictures and placed them in the frame, strung a ribbon through the top, and placed some lyrics that I remember from my childhood--about how we are like a present when we serve others--on the back.


A previous year I did a similar thing with my son's preschool group. I wasn't up for a painting project that year so I let the kids color their wood frames with red and green crayons to keep it simple and not have to worry about drying time.


The kids were SO excited to see their little ornaments all put together the next time we met. They each got to put their ornament in a box and wrap it up to put under the tree when they got home and give to their moms and dads on Christmas morning. It was so much fun to see the excitement in their eyes as they prepared these gifts to give away. I think they turned out adorably cute!


To see more ideas of gifts that kids give check out my gift guide HERE.


Monday, November 18, 2019

Snow Globe Ornament (Gifts Kids Can Make)


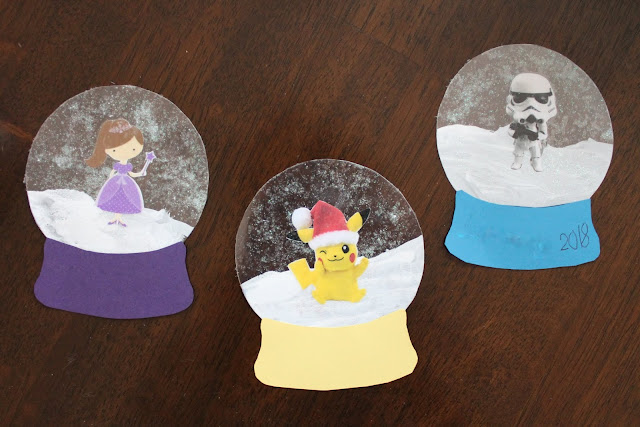
I ran into these laminated snow globe ornaments on Crafty Morning last year and thought they were so cute and clever. My kids helped me to make some to send to their grandparents for Christmas and I think they turned out great! I'm always looking for ways my kids can think outside of themselves at Christmastime and have opportunities to give to others. Be sure to check out my gift guide of gifts that kids can make and give for more ideas!


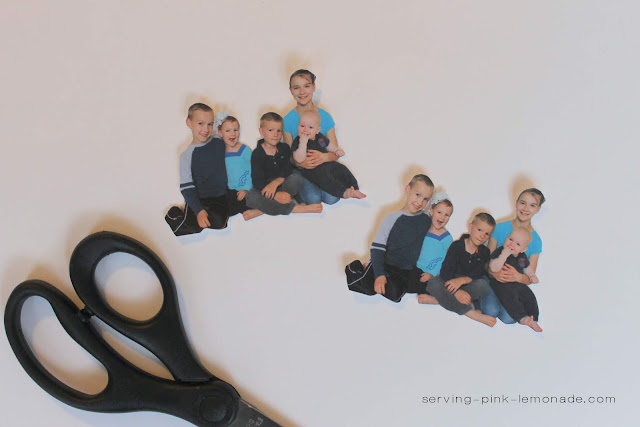
To make the snow globe ornaments I started out with a picture that I had taken earlier in the year of my kids. I copied it into a Word document and shrunk in down to be approximately three inches long. I then printed it onto card stock using a high quality print setting.


Then came the tricky part of cutting out around all the fine details.


I then opened a laminating pouch and on the inside drew a 3 1/2 inch circle using a pen. My kids helped me paint the lower half of the circle using craft paint and then we sprinkled on some fine glitter. We placed the picture in the center of the circle and after giving the paint a few minutes to dry closed the pouch and ran it through the laminating machine. Once cool we cut out the circles and cut the bases from blue card stock, two for each ornament.


Using double sided tape we overlapped the blue base slightly over the laminated snow globe making sure the edges were even. We then turned it over and applied a second base to the backside to give it a more finished look and a little more stability.


The final touch was punching a hole near the top, stringing through some bakers twine, and tying a knot. The kids were excited to then wrap them up and send them off the Grandma and Grandpa. I think they did a fabulous job! They turned out so cute!


And because we wanted to have some more fun with this snow globe idea a few of my kids made one of their own. It was fun to see what they chose to pick to go inside their snow globe, although I can't say I'm surprised--they picked some of their favorite things!


We had a fun afternoon crafting together!


To find more ideas of gifts kids can make, check out my gift guide HERE.


Monday, January 21, 2019

How to Sew a Ridiculously Easy Barbie Dress in Under a Minute


The other day my four year old found a bag of fabric scraps from old sewing projects. As she was looking through them she got a most terrible idea. "Let's make Barbie clothes out of this fabric Mom!" "No way Jose!" I thought. Sewing teeny tiny Barbie clothes is not what I consider a good time. But then inspiration struck that made both me and my daughter happy. Introducing "the ridiculously easy Barbie dress that can be sewn in under a minute". No tight seems to sew or itty bitty hems to finish. These pretty dresses are so easy to make, your Barbie could have a whole new wardrobe in just ten minutes.


You can even use the same pattern to make a long maxi dress, a shorter knee length dress, or even just a simple t-shirt.


Ready for the super simple instructions?

Start with a piece of knit fabric that is approximately 14 inches long and 3 inches wide. It has to be knit fabric or else the dress won't be able to stretch to fit onto the Barbie. Also, the beauty of using knit fabric is that you don't have to sew any hems or edges because it won't fray. This is a great way to use up small fabric scraps or even re-purpose an old pair of leggings or t-shirt.

Fold the fabric in half, right sides together, so that your fabric is now approximately 7 inches long. Starting at the bottom sew up toward the folded edge using a quarter inch seam allowance. When you get about a half inch from reaching the fold stop and back stitch. Repeat on the other side. Once done cut a semicircle along the center of the folded edge as shown below. The semicircle should be about 3/4 inch wide.


Super simple, right? At this point you're just about done. Now turn the dress right side out . . .


And ta-da! You're done. Dress complete. It doesn't get much easier than this.


Here she is, looking pretty in her brand new dress.


One of my favorite things about this pattern is that it still has sleeves without having to actually sew any. So simple, but still so classy.


So go ahead and raid your fabric bin for knit fabric. I know you're dying to whip up some new Barbie clothes now. Even better, have your daughter do it. This makes a great begging sewing project for kids. My twelve year old was excited to sew her little sister some of these easy dresses as a homemade Christmas gift, and she loved them! (See my other ideas for gifts kids can make HERE.)


Monday, December 3, 2018

Magnetic Bookmark Gift Set (Gifts Kids Can Make)


This magnetic bookmark gift set makes the sweetest little gift for anyone. It's perfect for parents, grandparents, siblings, and teachers. They're extremely budget friendly and easy to put together.

This year I helped my four year old make some of these bookmarks to give to her older sister and brothers for Christmas. I've probably said it 100 times, but I'll say it again. When children have opportunities to give they learn to love giving. Christmastime is the perfect time to give kids this opportunity. I especially love the value creating a homemade give adds to the experience. I've seen how the time, thought, and effort my children put into their gifts makes them especially excited about giving them. They become so focused on the gifts they're creating that they don't have much time to think about all the things they want. Be sure to check out more ideas on gifts that kids can make and give HERE.


Didn't these turn out so cute?


This is the perfect project to use up small scraps of scrapbook paper, or digital designs can easily be printed and used. I cut out strips of paper that were five inches long and 3/4 inch wide. The corners were then rounded, which was the perfect task for my four year old to help with.


We then folded the bookmarks in half and applied magnetic tape to the inside. I LOVE this ultra thin magnetic tape. I always have some on hand. It comes in handy for so many things and works perfectly for these bookmarks so they don't end up too bulky. You can see the bottom portion of the magnetic tape is slightly off center. This is so the magnets will line up evenly when closed. Experiment with the magnets you use so that they will be sure to close correctly.


To gift the bookmarks we packaged them together on a card with a quote at the bottom.


For my daughter we stuck with a Paris/music theme. For the boys we did Harry Potter and Star Wars.


I love the subtle Harry Potter hint these digital papers give. I probably could have easily come up with some wise words from Dumbledore or a found a great quote from JK Rowling to add to the bottom of the packaging but instead picked a quote that I thought my kids would love the most. Even though the quote doesn't really fit with the theme I knew my 10 year old would get a kick out of this one. Sticking with the Harry Potter theme though I used a free font called Harry P found on dafont.com.


This last one is for my Star Wars obsessed seven year old. Again, the quote isn't Star Wars related but he'll love it. I used the font called Star Jedi found on dafont.com.


My four year old especially loved clipping each bookmark onto the cards. She helped me wrap them up, complete with lots of pretty Christmas bows and put them under the tree. Her book obsessed siblings are going to love these bookmarks. I have a feeling they'll get a lot of use.


Find more gift ideas that kids can make HERE.


Wednesday, September 5, 2018

3D Perler Bead Pikachu


My kids went back to school this week. I feel like we start so much later than most of the country since we don't go back until after Labor Day. We had such a great summer that it was hard to send them off. My goal is always to give my kids somewhat of a good ol' fashioned summer. I want summertime to be a chance to slow down and explore life. To keep their eyes away from screens and give them a chance to get plenty of fresh air, go on bike rides, catch fireflies, carve soap, chew gum and learn to blow bubbles, swim, play at the park, read a lot of books, do arts and crafts, and hopefully have enough free time that they actually have a chance to be bored once or twice.


One thing my kids had fun with over the summer was creating things out of perler beads. My kids love these things! My nine year old got really creative and figured out how to make a 3D Pikachu. He then went on to make some other Pokemon characters and then my other kids started making them too and before you know it we had a house full of Pokemon!


My son thought other kids might like to learn how to make a 3D Pikachu too so he suggested we could put the instructions up on my blog. So here it is:

How to make a 3D Pikachu out of Perler Beads

Follow the pattern below to create the pieces to build your Pikachu. As you can see the feet on the green plate need to be on a plate that has pegs at an angle.


Here are all the pieces ironed and ready to start building. The key to making your Pikachu come together easily is to iron the pieces just enough to have them melt together. If you use too much heat and pressure so that the pieces get too flat it will be hard for the pieces to fit together easily.


Putting your Pikachu together is kind of like building a 3D puzzle. The pieces fit and lock together. Follow the visual instructions below to build your Pikachu.


All done! Isn't he cute?


Using the basic design of the Pikachu it's easy to create other Pokemon. Here are a few favorites: Wartortle, Charmander, Pikachu, Minccino, and Charizard.


Learn how to make a 3D Perler Bead Pokeball HERE!


Now go create 'em all!