Halloween Paper Bats Garland {+ Cut Files}
This Spooky Halloween Paper Bats Garland is an amazingly easy project to make, perfect to make with kids, and such a spooky cute Halloween decor for the home this coming Holiday! Just a few supplies and lots of fun!
Halloween is around the corner and I was definitely behind on decorations LOL.

Table of Contents
Spooky Halloween Paper Bats Garland Decoration
I thought that since I hadn’t done a Halloween garland before, it would be nice to have some cute spooky bats hanging around the house =D.
This post may contain affiliate links. Please read our Disclosure Policy.
Also, I thought you would like to DIY and have the cut files in case you like my little fellas. So you will find a free printable bat template and cut files here.
I wanted to have my bats hung upside down with funny faces and different poses. So, I looked for some examples over the Internet and finally made my own.
So much fun!
Enjoy this Spooky Halloween paper diy bat garland!
How to make this Halloween Paper Bats Garland
I absolutely love DIY Halloween decorations so I thought this cute craft would make a great project for this holiday!
With the Silhouette everything is so much easier, isn’t it? And this garland once the shapes were done, it was about just having fun putting it together.
Supplies:
- Black Cardstock – about 2 or 3 12×12. Black construction paper works too.
- Yarn or twine – in the color of where you are going to hang it.
- Contact glue
Tools:
- Hot glue gun and glue sticks
- And of course, the Silhouette
- Pencil, pair of scissors, and printer if you decide to do it by hand.

Instructions:
Step 1: Design and prep work
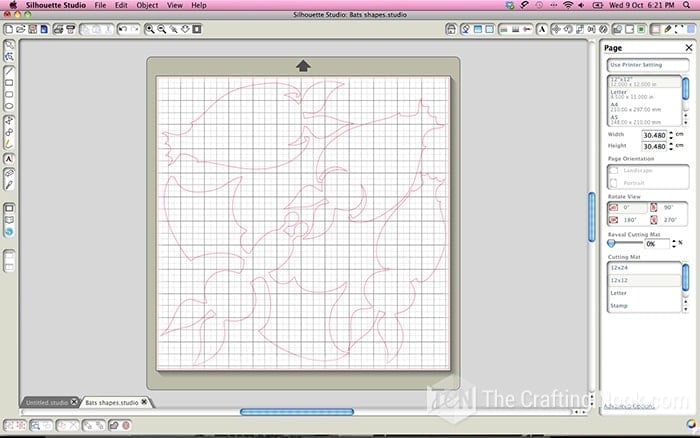
I decided that between 18-20 cm tall would be a good size for the bats so I place them on the silhouette Studio, luckily all four bats fit on the mat LOL.
Cut the necessary cardstock pieces.
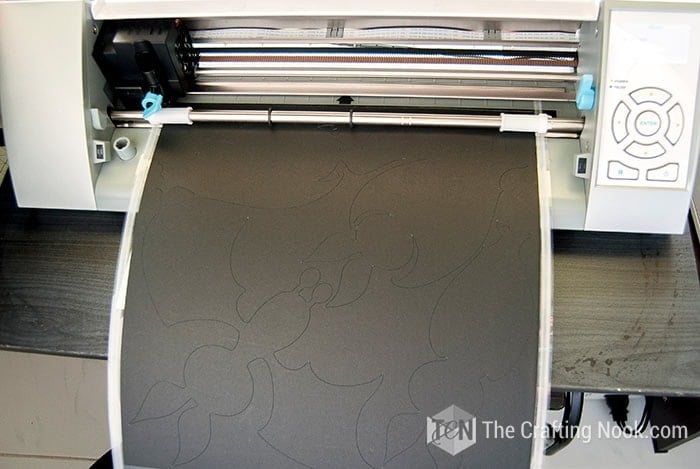
I set my Silhouette Cameo in pace, applied the right settings and got started.
Step 2: Cut the Bat pieces
Firstly, I cut the bat shapes 4 times on black cardstock, so I would have 16 bats.

Then on another file, I placed the eyes and cut them once.


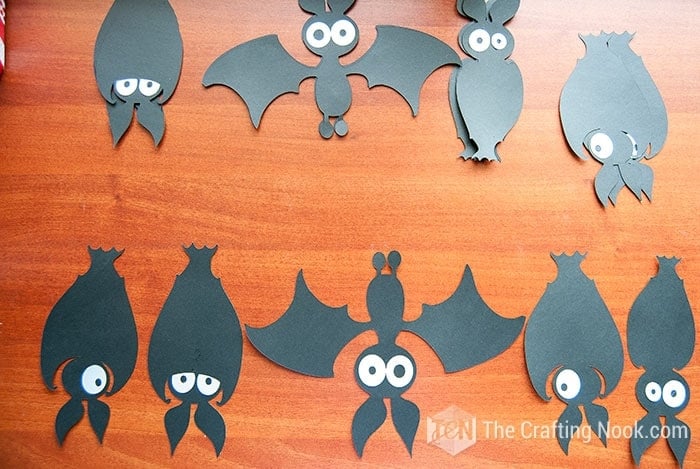
Step 3: Assembling the bats
Once I had everything cut out I started gluing the eyes to the bats.


I had something like this:

I loooove this one LOL

Step 4: Assembling the Garland
Next, I took the wool and made my measurements on where I was going to place the garland {decided to put it on the window}.

I had fun organizing the bats differently along the strip.
Lastly, I glued them with hot glue gun. I also added some fun eyes on the window to make it spookier LOL.


Step 5: Hanging the Bats!
Finally, when finished gluing all the bats I hung them in the window and waited until sunset to take pictures.
In the end, I really love how it turned out. At night with the little light that comes from outside when the eyes adjust you can still see the white from their eyes LOL.
And during the sunset, it’s just shaped like they were facing the window.


So, there you have it!
Crafting Tips
- If you don’t have a cutting machine, you can still make this garland. You just need to snag and print the template at home use it as a template to trace the bats and eyes on the cardstock and cut with scissors or a craft knife.
- To make each bat stiffer, you can cut each bat twice and glue them together after gluing the string.
- Avoid using white school glue because it tends to bend and wrinkle the cardstock depending on the weight. I recommend contact glue, cold silicone, mod podge, etc.
A lot of fun and super cute Halloween Paper Bats Garland!

What do you think???? What have you done to decorate your home????
Frequently Asked Questions
You can cut bats in different ways; you can use a template can cut them by hand or you can use a cutting machine like Silhouette or Cricut.
When you’re done cutting, hang them upside down then glue them to the string. If you’re hanging them outside like in front of your house, use duct tape or nails to secure the strings.
Another way to hang these bats is by poking holes in the bat for monofilament: in the feet for an upside-down bat, in the wings and head for one that’s right side up. Hang from ceilings with masking tape or removable hooks.
More Halloween Ideas to Try
If you enjoyed this cute Halloween Paper Bat Garland tutorial, you might also love these other Halloween project ideas too:


✂️ Tutorial

DIY Spooky Halloween Paper Bats Garland
Tools
- Hot glue gun and glue sticks
- And of course, the Silhouette
Supplies
- Black Cardstock – about 2 or 3 12×12
- Yarn or twine
- Contact glue
Instructions
STEP 1: DESIGN AND PREP WORK
- I decided that between 18-20 cm tall would be a good size for the bats so I place them on the silhouette Studio, luckily all four bats fit on the mat LOL.
- Download Spooky Halloween Bats Shapes {Studio File and Printable}
- Download Spooky Halloween Bats Eyes {Studio File and printable}
- Cut the necessary cardstock pieces.
- I set my Silhouette Cameo in pace, applied the right settings and got started.
STEP 2: CUT THE BAT PIECES
- Firstly, I cut this 4 times on back cardstock, so I would have 16 bats.
- Then on another file, I placed the eyes and cut them once.
STEP 3: ASSEMBLING THE BATS
- Once I had everything cut out I started gluing the eyes to the bats.
- Follow the photos to match the eyes to the body.
- Cute first bat done!
- Finish all your bats.
STEP 4: ASSEMBLING THE GARLAND
- Next, I took the wool and made my measurements on where I was going to place the garland {decided to put it on the window}.
- Have fun organizing the bats differently along the strip.
- Lastly, I glued them to the yarn string with hot glue gun.
STEP 5: HANGING THE BATS!
- Finally, when finished gluing all the bats I hung them in the window and waited until sunset to take pictures.
- I also added some fun eyes on the window to make it spookier LOL.
And if you’d like to check out some more Silhouette creations, here’s a collection of projects by my Silhouette Challenge buddies:

Crafting with Glitter Just Got Easier by Create & Babble
3D Haunted Forest by Chicken Scratch NY
Pumpkins and Peacocks Fall Mantel by joy & gladness of heart
Wedding Gift Wrapping by It Happens in a Blink
Glitter Monogrammed Pumpkin by unOriginal Mom
Faux Stitched Speech Bubbles by Get Silvered Craft
A Mario Bros. Backsplash by Please Excuse My Craftermath…
Halloween Party Treat Bags by The Thinking Closet
Decorated Pumpkins by Tanya’s Creative Space
Fussy Cutting Making You Fussy? by My Paper Craze
Cut Fabric With Your Silhouette by Cutesy Crafts
Cookie Lee Jewelry’ Gift Bags with a Purpose: Sharing Thankfulness by An Elegant Touch
Halloween Banner by Sowdering About
Share and PIN ME!

Til’ next time…


FREE WORKBOOK
Keeping your Sweet Home Organized
Learn how to create intentional habits and simple routines to Keep Your Home Organized. Plus freebies, printables, exclusive content, and tips.
Disclaimer: By clicking on the “Yes” button above you are giving me your consent to collect and use your information according to the law and My Policy Privacy. Zero Spam I promise!
Thank you so much for your sharing ! This garland is just so cute !
Thank you so so much Sophie, I so appreciate your sweet comment!!!
Hope you enjoy it!
Hugs
Your bats are so cute and whimsical! Is there a file I can use in order to hand cute these bats and eyes? Unfortunately I don’t own a cutting machine, but would love to still be able to make these.
Hi Kay, thank you so much for your sweet words. I swear I thought I had updated the files to add some printable versions. Glad you pointed it out. The files are now updated so you can go ahead and download them. You will find SVG and JPG files that you can print but please keep in mind to keep proportions between bat shapes and eyes, i.e: If you fit on paper (printer setting)and the reduction is, let’s say to 95% on the bat’s shape files, make sure you make the same reduction on the eyes file as well so they fit in the bat’s shape.
hope I made sense and that this helps!
Enjoy this project and if you feel up for it share your final project!
Hugs
Love your bat garland! They are the cutest, spookiest little bats. You did a fantastic job. Thank you for linking up with us Inspiration in Progress last Thursday!
These are so cute! I love how they look up against the sky! So fun!! Thanks for linking up at TGIF link party!
Stopping by to let you know I featured you today on my Spooktacular Linky Party Final Features! Thanks so much for joining this years party! Kim
We love these little guys – terrific tutorial this week.
You’ve been featured on BeBetsy at the BRAG ABOUT IT No. 27
Thanks for linking up with us. Have a fun HALLOWEEN!
Sharon and Denise ♥
This is soo cute! I love it! Thanks so much for linking up this week! Kim
Your bats are ADORABLE! Thanks for sharing at the Pinworthy Project Party!
This is so cute. I would just keep adding and adding!I don’t have any kind of cutting machine but wishing for someday.
How great are those little guys. I love them, and it’s times like these that I wish I had a silhouette. Maybe next year…
Thanks for the great idea
Bats never looked so fine! Love what you can do with card stock.And those googly like eyes are so fun. Visiting via LOBS from over at #6 in the link up.
I can’t seem to open the files you’ve attached. Is there another way to receive them? I love this idea but am not super crafty/creative to make my own.
These are so cute!!!
I have a Silhouette and have yet to put it to good use! These are super cute! Thanks for linkin up to Sunday FUNday!
these are so fun. i love how on one side they seem creepy but then you see there eyes and you can not help but laugh! as always thanks for linking up to the all things pretty linky party!
These are too cute! Thank you for sharing them! I can’t wait to make them tomorrow!
I love these bats! They are just tooo cute!
love the eyes the best! They are awesome! Thanks for hooking up to Snickerdoodle Sunday!
Love this. Looking forward to hanging it out front for the trick-or-treaters. Thanks!
Adorable! I just post some DIY Halloween decorations. I was going to follow you, but when I mouse over your media icons it just will let me pin it. Let me know when it is fixed or how to follow you and I will. Charlie @http://pickledokra.blogspot.com/
that garland turned out great! I wonder if it scares anyone from the street!
Oh my goodness – – those silly bat eyes simply make this garland a stand-out piece! So playful! So creative! So very Camila! Thanks for sharing this cut file with us, as well. You’re the best.
These cheeky bats are so cute. Lot’s of fun – I love their shapes!
love the bats! thanks so much for sharing!
These are too cute!!!
Holy crap this is amazingly awesome. I need it!!!! A great job!!!!!!! Please link up with my link up party this week! I want you to be my feature, thats how much I love this!!! http://www.sowderingabout.com/2013/10/trick-or-treat-thursday_10.html
I am also stopping by from the Silhouette hop!
Those are the cutest bats every! Adorable!
Very cute!
These bats are too stinkin’ cute! I love the eyes!
Stopping over from the Silhouette Challenge!
These are so stinkin’ cute!! Those eyes get me every time. They kinda remind me of the googly 3D eyes that move around when you shake them. Not sure if you know what I mean. Either way I wish I hadn’t used up my stash of black and white paper for my birthday invitations so I could make some of these just in time for Halloween!
Much Love,
Trisha D.
These are really cute. Thanks for the cut file!