Hi there Creators I figured I'd try my hand at an "impossible" card today (not to be confused with the never ending card🤣) But, just quickly don't forget to check out the retiring bargains in my Stampin' Up! shop (there's some great reductions!😉) I think it's called "impossible" due to the fact it is made from one piece of A6 cardstock I used the gorgeous Botanical Textures Designer Series Paper and the Beautiful Butterflies Bundle (Stamps, dies, embossing folder) I figured they actually went quite nicely together. The card I made up and showed in the video is this one: I wanted a pop of colour hence the butterflies ended up in Berry Burst with some of the lovely Basic Gray & Smoky Slate Pearls on them then as I ended up cutting 2 sets of designer Paper I also made up this card , and coloured in the paper using Stampin' Blends (alcohol markers) so I could get graduation of colours. I reckon you could probably make this card any siz...
Watercolour technique for a Watercolour challenged individual.
- Get link
- X
- Other Apps
HI there Creators
Well this week I'm joining in the Watercolour Technique Blog run by Crafty Collaborations which is a collection of Stampin' Up! demonstrators from all over the world😊 this one was truly a challenge as I'm not really that great at watercolour!
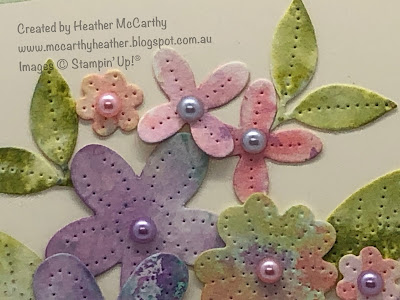
So I had an idea that I wanted to watercolour a few flowers from my new Pierced Blooms dies and make a kind of bouquet out of it, my initial attempts at properly watercolouring them failed dismally lol however after dropping one into the remains of colour that was on my silicone sheet I had an idea......
Here is the card I made, and I have some close ups and explanations to follow.
So my technique.... I used water color paper and cut out the die pieces, then painted each piece with water, inked up a blank stampin' block then dabbed the block onto the pieces till I liked the colour of them, with the flowers I repeated this method with a couple of colours. I've used the Subtles colours.
I really love the way it gives that slightly splotchy look (plus it's so easy to accomplish)😉
For the label I've stamped first, with one of the saying from the matching In Bloom Stamp set then cut out with the dies, and just painted the edges with water, then dabbed the inky block onto the edges. Just so you know the dies and stamps do come as a bundle - In Bloom Bundle (yay for 10% off!!) I really felt this ribbon the Pool Party Sheer ribbon matched the watercolouring on the card nicely.
Lastly I've added some of the oh so gorgeous Pastel Pearls, it was very hard only to add a couple hence every flower ended up with pearls lol.
Well that's it from me, I hope it inspires you to have a go at this way of watercolouring!
do check out what the others in this blog hop have created
God Bless love
Heather xox
Linky Tools subscription expired. List not available.
- Get link
- X
- Other Apps
Comments
Popular posts from this blog
Something Saturday - Mixed Media Florals
Hi there Creators, Well today I thought we'd check out something from the new catalogue, which will be live in just a few days (7th Jan). I saw the Mixed Media Florals Memories & More Card Pack in the catalogue and thought they looked lovely, and yes they really are gorgeous! (link prob won't work till 7th) Anyway in the video I show off all the cards in the pack, and mention that I am doing share packs for various things in the new catalogue (Designer Paper, Ephemera Packs, Embellishments, Ribbons and this Memories & More) See more details at the end or send me a message. And here are the cards I made up using the Basic White Assorted Memories & More Cards & Envelopes : This firs one uses one of the larger cards, a couple of stickers, the stamp set "simply said" for the saying and some of the pretty Riverside Irregular Pearls . Then this card is a small one, using the same stamp set "Simply Said" , a sticker and some more of the Riversid...
Something Saturday - Twisted Star Ornament
Hi there Creators I saw this cool star ornament in another video, and had a bit of a play around with it, ending up with this.... (with a retired Designer Series Paper) Then I ended up making this one (somewhat puffier 🤣) in the video with the current Natures Sweetness Specialty Designer Series Paper Ok, to make this you'll need 16 strips of 15cm x 1cm Designer Paper & glue (I used tombow) Use 8 of the pieces for each side of the star, you twist them like a Breast Cancer ribbon, but with a small "head section" and have a gap of around 4cm at the free end, and around 4cm of the 2 free arms (if that makes sense, it should if you've seen the video!) you then glue 8 of the "heads" together to make the middle of the star then the tails glue together to form the points. once you've made up 2 of these, you then glue them back to back, adding a piece of twine into the last point If you missed the video here it is: I hope this inspires you to create one t...
GDP #261
Hi there Creators, The Global Design Project #261 challenge this week is a colour challenge: (check out the link to see what others have done) So I thought I'd join in again, and try out a card type I've seen someone else show off recently I know it would have been on one of the Stampin' Up! facebook pages, I can't remember exactly what she used, but I liked the 3D'ness of it 😄 and I have no idea what the card is called possibly Diorama card would work? anyway I set to work trying to work out how she'd done it (although I suspect if I could re-find hers she'd probably already done instructions lol) I always seem to take the hard way..... So here is my "take" on it using these colours. The inside is the impressive bit..... The outside not so impressive, but check out that gorgeous Gilded Autumn Specialty Designer Series Paper ! I've teamed it up with the Ornate Layers Dies , and the super soft ribbon from the Basket Weave & Metall...
I love the way you watercolored the flowers!
ReplyDeleteI love the look of this - it's absolutely beautiful!
ReplyDeleteI think you've done an amazing job. Beautiful
ReplyDeleteLove the look of the watercoloured flowers! Beautiful card
ReplyDeleteLovely card :-)
ReplyDelete